Since I was not able to scrap last weekend, I thought I'll just share stuff that inspired me this week.
Jennifer McGuire and Joy Taylor have a week-long challenge in their blogs. They are now on day 6. Day 7 has been postponed as Jennifer got sick. I find it inspiring how these two ladies managed to come up with very different projects using the same stamps (or stamp sets). It just goes to show that there is no limit to one's creativity.
I've been admiring Keisha Cambell's work for some time now. Her layouts are always so classy and elegant. So different from my own style but I do pick up inspiration from the little elements of her layout. I love the butterfly die cuts from her latest set of layouts!!!
I love Pia's work. Her layouts are always so fun and colorful! I always feel so inspired after checking out her blog and seeing her work. She is one girl who sure knows how to use COLOR on her layout!
I miss my friend Cookie. She is now making us proud in the land down under. Look at her layout! Oh, and her cards! Gorgeous! She is one generous soul, too! She's always willing to share her scrappy blessings with her scrappy sisters.
Iris is another local talent who made it big in the international scrapbooking scene. She is the first Philippine-based Memory Makers Master. I have been blessed to attend her classes locally and she continues to inspire through her blog. I love how she uses different art mediums in her layouts. Every project she makes is truly a work of art.
That's all for now! More inspiration next week.


Inspiration Monday
If you dig Christine Middlecamp's Doily tutorial, then you might be interested to know she has another one up her sleeve. See her announcement here. I am so excited! I'm sure it will be another fabulous one. The little sneak peak is enough to leave me in eager anticipation. I followed her doily tutorial and I was floored by her creativity. Really inspiring! Granted that I didn't make any doily (I did buy a set - and it's still gathering dust somewhere - in my kitchen maybe?) embellishment, her tutorial inspired some of my projects, the latest of which was my last post Best of Cambodia. The layered embellishment on the upper right and lower left corners were my attempts to channel Christine Middlecamp.
I also follow Lucy Abrams' blog. I found her through Jennifer McGuire and she is also a Hero Arts designer and a very creative cardmaker, and she's from the UK. She has a giveaway and I joined for the first time! How can I not? Lots of yummy Hero Arts goodness there. I figured if I win, I can have the prize sent to my brother in law in Scotland. He and his wife are are coming home for a vacation later this year. I can wait. If you're interested, as much as I don't want to decrease my chance of winning, click here.
Another card-maker that I love is Kathy Racoosin. She is a designer for Penny Black and SRM Stickers, and she is a very talented colorer (is that a word?). Well, she uses Copic markers to color her stampe dimages in many of her projects, and she sometimes shares step by step tutorials like in this post. What an enabler! Reading through her post now makes me want to grab my Copics and color away. Except that I decided to leave my markers in Cavite thinking that I won't have the opportunity to color. Oh well.
Karen Russel - I am a huge fan! Stalker level. I don't know how she manages to take such amazing photos! Taking one of her classes remains to be one of my top personal goals. A bit steep at US$400 but if it will bring me closer to taking photos as good as she does, it's definitely worth it! I love how she shares her life stories through photos. So beautiful.
I want to do this. I will do it for free, just so I can try it. I know I'll cry buckets of tears (I'm such a softie) but I also know I'll take very good photos. I need volunteers!!! Here's another great example. I want to capture real life, raw emotion, unguarded moments - things you cannot manufacture in a studio.
I also want to do travel photography like this. I want to see the beautiful world that God gave us and share it with everyone else.
I hope this inspires you all.
I also follow Lucy Abrams' blog. I found her through Jennifer McGuire and she is also a Hero Arts designer and a very creative cardmaker, and she's from the UK. She has a giveaway and I joined for the first time! How can I not? Lots of yummy Hero Arts goodness there. I figured if I win, I can have the prize sent to my brother in law in Scotland. He and his wife are are coming home for a vacation later this year. I can wait. If you're interested, as much as I don't want to decrease my chance of winning, click here.
Another card-maker that I love is Kathy Racoosin. She is a designer for Penny Black and SRM Stickers, and she is a very talented colorer (is that a word?). Well, she uses Copic markers to color her stampe dimages in many of her projects, and she sometimes shares step by step tutorials like in this post. What an enabler! Reading through her post now makes me want to grab my Copics and color away. Except that I decided to leave my markers in Cavite thinking that I won't have the opportunity to color. Oh well.
Karen Russel - I am a huge fan! Stalker level. I don't know how she manages to take such amazing photos! Taking one of her classes remains to be one of my top personal goals. A bit steep at US$400 but if it will bring me closer to taking photos as good as she does, it's definitely worth it! I love how she shares her life stories through photos. So beautiful.
I want to do this. I will do it for free, just so I can try it. I know I'll cry buckets of tears (I'm such a softie) but I also know I'll take very good photos. I need volunteers!!! Here's another great example. I want to capture real life, raw emotion, unguarded moments - things you cannot manufacture in a studio.
I also want to do travel photography like this. I want to see the beautiful world that God gave us and share it with everyone else.
I hope this inspires you all.
Best of Cambodia
I just needed to scrap today (stressful week) and since I am out of ink, I just rummaged through my pile of photos and decided to scrap these couple shots from our Cambodia trip last year. Coincidentally, the July Kit of Studio Calico (Continental) happened to be sitting on my work table and it's a travel-themed kit! So I quickly started working and came up with this layout. The photos were desaturated so it worked perfectly with the papers of the kit.

Here's a closer look at the details. I used foam tape to layer the die cuts to create a bigger layered embellishment.

I love the vintage feel of the kit which I thought went well with the desaturated photos.

Got the idea to overlap two colors of chipboard alphas from Cookie's "Simple Joy" layout.

Thanks for looking!

Here's a closer look at the details. I used foam tape to layer the die cuts to create a bigger layered embellishment.

I love the vintage feel of the kit which I thought went well with the desaturated photos.

Got the idea to overlap two colors of chipboard alphas from Cookie's "Simple Joy" layout.

Thanks for looking!
I-Rock Rocks!
A girl can never have too many tools! So when I heard about I-Rock from Imaginisce, I got curious. I-Rock is an applicator for bling. Just what I need, a marriage of two things I love - Tools + Bling!
The system is very easy to use. First, dip the Jewel Setter Stick into a little bit of water to dampen the tip. Then, pick up a piece of crystal using the tip. You can also opt to use tweezers instead. Please ignore my nails. I know they badly need some loving!

Use the stencil to create a pattern for your crystals. Simply set appropriate size of bling on the hole of the stencil.

Then switch the tool to the "on" position. This does not heat the tip yet. You have to press the small button on the switch to start heating the tool. You have to keep this pressed until the crystal is set, which won't take longer than a few seconds. Just lightly press the tip of the tool on the crystal to prevent it from sliding. Note that the stencil is made of heat proof material similar to the Ranger Craft Mat or Bazzil Splat Mat.

You can also opt not to use the stencil and just make your own designs.
Here is one of the finished cards. I used a die cutter to cut the label shape and embossed it using an embossing folder. Then I distressed the edges using Distress Ink. The butterfly is a digital stamp which I colored using Copic Markers, then cut and adhered to the card. I added a handwritten sentiment on a piece of scrap paper. The jewel swirl was created using an I-Rock stencil.

On this second card, I adhered jewels on the butterfly image. Then I applied more jewels randomly on the card using the I-Rock tool.

What can I say? I-Rock rocks!!! Overall, the I-Rock tool is very easy to use. There is a huge selection of crystals, pearls and studs. Different patterned stencils are also available. The Jewel-Setter Sticks are very useful specially for the teeny tiny pieces of crystal. For the bigger pieces of bling, you can either use tweezers or just pick them up with your fingers.
I-Rock products are now available at My Little Attic. Nenette just got the box of goodies late last week so these aren't posted yet on the website as of this writing. Just send her a quick email to reserve. If you hurry, you might just get your hands on this cool tool.
UPDATE: I-Rock products are already posted at the MLA website. To check them out, click here.
 |
| l-r: Jewel-Setter Sticks, Crystal and Stud Heat-Setting Tool, Stencil Kit, Hot Rocks Compact |
 |
The Crystal and Stud Heat-Setting Tool - runs on 3 AA Batteries |

Use the stencil to create a pattern for your crystals. Simply set appropriate size of bling on the hole of the stencil.

Then switch the tool to the "on" position. This does not heat the tip yet. You have to press the small button on the switch to start heating the tool. You have to keep this pressed until the crystal is set, which won't take longer than a few seconds. Just lightly press the tip of the tool on the crystal to prevent it from sliding. Note that the stencil is made of heat proof material similar to the Ranger Craft Mat or Bazzil Splat Mat.

You can also opt not to use the stencil and just make your own designs.
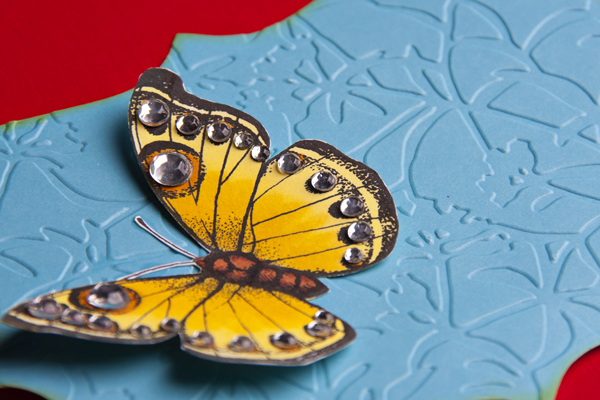 |
| Add bling to embellish a stamped image |
 |
| Use the stencil for easy patterns |

On this second card, I adhered jewels on the butterfly image. Then I applied more jewels randomly on the card using the I-Rock tool.

What can I say? I-Rock rocks!!! Overall, the I-Rock tool is very easy to use. There is a huge selection of crystals, pearls and studs. Different patterned stencils are also available. The Jewel-Setter Sticks are very useful specially for the teeny tiny pieces of crystal. For the bigger pieces of bling, you can either use tweezers or just pick them up with your fingers.
I-Rock products are now available at My Little Attic. Nenette just got the box of goodies late last week so these aren't posted yet on the website as of this writing. Just send her a quick email to reserve. If you hurry, you might just get your hands on this cool tool.
UPDATE: I-Rock products are already posted at the MLA website. To check them out, click here.

Subscribe to:
Posts (Atom)
