Showing posts with label Cards. Show all posts

Dressed up jewelry box and some cards

This is one of two "naked" jewelry boxes given to me by a good friend years ago. She knew I am into arts and crafts and would be able to transform the boxes into something beautiful. It took me a very long time to work on the first box and finally transformed it in 2008. You can see it here. Now, two years later, I worked on the second box. Here is the "before" picture.


The first step is to unscrew all the metal hinges and closures using a small screwdriver. Then sand the box and wipe with a damp cloth.

Then apply two coats of gesso all over the box including the inside, letting the layer dry in between aplications.


Apply two coats of brown acrylic paint making sure that the surface is totally covered and the white gesso won't show through.


Cut small pieces of patterned paper (I used Crate Paper Pink Plum Collection - Wildberries) to fit the sides of the box, as well as the inside bottom. Adhere the paper using decoupage glue. Dab a small amount of brown paint on the edges of the paper to cover the white core. Set aside.


Apply embossing ink on the cover of the jewelry box. Sprikle with UTEE and heat. Apply 3-4 layers of UTEE. After the last layer, let dry. Dab red and butterscotch alcohol ink on the dried layer of UTEE. Then dab copper alcohol ink to give it a metallic look. Heat again to bring out the shine. Before the UTEE dries completely, press a rubber stamp to leave a textured impression. Let dry. Embellish with flowers. Here is the top view with the stamped impression clearly visible.


Here's another view. You will note that I've re-attached the hinges and closures.

And inside, I attached a photo of myself and Ariel. Now, this is truly a treasure box!

Now, onto some cards.

Cut 8.5” x 5.5” pieces of paper (I used Crate Paper Pink Plum Collection papers). Fold in half to make the base card.

Using a die cutting tool, cut label shape from scraps of patterned paper or Kraft paper. Apply pink paint around the edges using your forefinger. Adhere die cut on the center of the base card.

Stamp sentiment on the upper right corner of the die cut and heat emboss using copper powder.

Cut Bazzil flower in half. Dip edges on embossing ink and sprinkle with distress embossing powder. Heat set. Adhere flower on the bottom left of the card. Embellish with cut outs from patterned papers (these are from Crate Paper - Paper Doll collection).


For the next set, prepare the same base card using patterned paper (I used Crate Paper – Paper Doll Collection papers) and Kraft Paper.

From scraps of Kraft Paper and patterned paper, die cut label shape. Distress edges of card and die cut shapes using Distress Ink. Adhere on the center of the card.

Stamp on a paper flower (Bazzil) using distress ink that matches colors of your die cut shapes. Adhere flower on the center of the card. Adhere fabric blooms (Basic Grey Sugar Rush) on the center.

This All-Occasion card actually takes only a few minutes to make and is a good way to use up your supplies.


These next two cards are very easy to make. Cut two sheets 4.25” x 5.5” rectangular shapes from Kraft Paper. Cut 2 pieces of the same shape from a patterned paper (these are from Crate Paper Pink Plum Collection). Get an old credit card, ATM card, playing cards or similarly shaped chipboard (I used the backing of Crate Paper Brads). Apply a strip of paint on the edge of the card. Use this to apply paint on the rectangular pieces of Crate Paper. It will not be perfect which is great. Some of the patterns on the paper will still be visible and the thin coat of paint will let the texture of the paper show through. Let dry.

Cut all four pieces of paper (the Kraft paper and painted Crate Paper) into a label shape using a die cutting tool – making sure you cut them one at a time. Now you have four pieces of label-shaped papers.

Score the Kraft papers about ½ inch from the left edge and fold. That will be where the card will open and fold.

Adhere patterned paper on the side of the Kraft Paper making sure that the painted side is facing up. Embellish with chipboards, stickers, trim and cut outs from your paper scraps.

Apply Stickles and Diamond Glazed on some of the elements for added texture, shine and dimension.


In the previous set of cards, I used some label shaped die cuts. That left me with a couple of negatives which I used in this next set. The card on top is made from Kraft Paper base while the one in the bottom is made from Pink Plum base.

I simple adhered the negative die cut which now functioned as a frame. The Kraft frame in the bottom was adhered using foam adhesive so it has a bit of dimension. I then embellished with chipboards and stickers.

Apply Stickles and Diamond Glazed on some of the elements for added texture, shine and dimension.


Crate Paper and Basic Grey products are all available at My Little Attic. Check it out!

Thanks for looking!

I-Rock Rocks!

A girl can never have too many tools! So when I heard about I-Rock from Imaginisce, I got curious. I-Rock is an applicator for bling. Just what I need, a marriage of two things I love - Tools + Bling!

l-r: Jewel-Setter Sticks, Crystal and Stud Heat-Setting Tool, Stencil Kit, Hot Rocks Compact

The Crystal and Stud Heat-Setting Tool - runs on 3 AA Batteries

The system is very easy to use. First, dip the Jewel Setter Stick into a little bit of water to dampen the tip. Then, pick up a piece of crystal using the tip. You can also opt to use tweezers instead. Please ignore my nails. I know they badly need some loving!

Use the stencil to create a pattern for your crystals. Simply set appropriate size of bling on the hole of the stencil.

Then switch the tool to the "on" position. This does not heat the tip yet. You have to press the small button on the switch to start heating the tool. You have to keep this pressed until the crystal is set, which won't take longer than a few seconds. Just lightly press the tip of the tool on the crystal to prevent it from sliding. Note that the stencil is made of heat proof material similar to the Ranger Craft Mat or Bazzil Splat Mat.

You can also opt not to use the stencil and just make your own designs.
Add bling to embellish a stamped image

Use the stencil for easy patterns
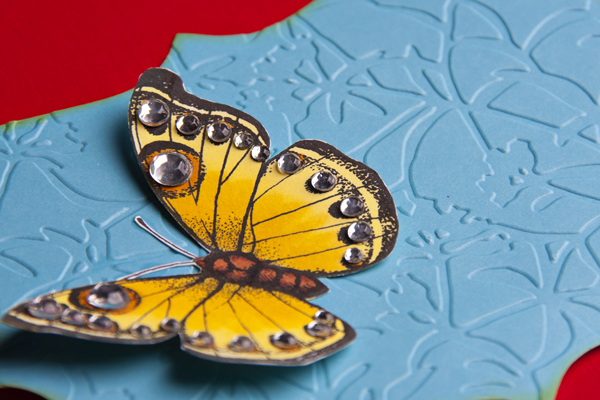
Here is one of the finished cards. I used a die cutter to cut the label shape and embossed it using an embossing folder. Then I distressed the edges using Distress Ink. The butterfly is a digital stamp which I colored using Copic Markers, then cut and adhered to the card. I added a handwritten sentiment on a piece of scrap paper. The jewel swirl was created using an I-Rock stencil.

On this second card, I adhered jewels on the butterfly image. Then I applied more jewels randomly on the card using the I-Rock tool.

What can I say? I-Rock rocks!!! Overall, the I-Rock tool is very easy to use. There is a huge selection of crystals, pearls and studs. Different patterned stencils are also available. The Jewel-Setter Sticks are very useful specially for the teeny tiny pieces of crystal. For the bigger pieces of bling, you can either use tweezers or just pick them up with your fingers.

I-Rock products are now available at My Little Attic. Nenette just got the box of goodies late last week so these aren't posted yet on the website as of this writing. Just send her a quick email to reserve. If you hurry, you might just get your hands on this cool tool.

UPDATE: I-Rock products are already posted at the MLA website. To check them out, click here.

Quickie

Ariel and I plan to drop by the hospital to visit a friend who just gave birth. I already baked some muffins to take to the hospital and placed it in a circular container. Being a scrapbooker, I couldn't just leave the box of muffins bare. So I tied a ribbon around the container. Then I thought, I can't just give this to her without a card! So I made one.

I finished this card in just a few minutes. I just used paper scraps, a border punch, distress ink, a piece of trim, a brad, and alpha stickers.

The base is 5x7 so I just cut a 4.5 x 6.5 piece of patterned paper, and another 1 x 6.5 strip from the same paper (I used the back). Then I punched one side of the bigger piece of paper and inked everything with Fired Brick Distress Ink. After that, I just adhered everything. Voila! A finished card.


Thanks for looking!

So thrilled!

Birthday Birdcage

This simple card of mine had been featured at the Hero Arts Social Club TODAY, April 15th 2010. I am so thrilled! I found out about it when I logged into my Flickr account. Juicyflavor left me a message congratulating me for being featured. Of course I had no idea! So I went and checked Hero Arts' blog and there it was. My card. This is what I call return of investment.

Digital Debut

So a few of my scrappy friends know about my admiration (probably an understatement) for Jennifer McGuire. She is not only a brilliant craft artist. She also has a big heart. I stalk her blog. I get daily inspiration from her work. And I like that she shares her talent with everyone! I love watching her tutorials ad I learn a lot from them. As far as I am concerned, any manufacturer who gets her as an endorser would get very good ROI. I can't count the times I have decided to purchase a product just because Jennifer McGuire used it. Stamps, Inks, Glossy Paper, even tools! It was also because of her that I came across Lucy Abrams and Kathy Racoosin. Between the three of them, I have enough card-making inspiration to last a lifetime. Anyway, stalking these three blogs got me seriously considering digital card-making. So, last night, I downloaded my first couple of digital stamps from Hero Arts over at Two Peas.

I lost no time trying out the digital stamps. So here are my creations.

For this "everyday" card, I used a combination of rubber and digital stamps. I printed several butterfly images on a letter-sized cardstock and colored two of them with varying shades of yellow Copics.

Meanwhile, I stamped a floral set on white cardstock and colored it with Copics. I cut a slit on both sides of the stems and wrapped a ribbon around the bouquet of flowers. I then inked the edges of the cardstock with Peeled Paint distress ink and adhered it on an A2 card.
Butterfly and Flowers

Then, I layered two butterflies on the cardstock. I added bling on the center of some of the flowers for a bit of sparkle.
Butterfly and Flowers 2

My next card is made from 100% digital elements. Even the background paper was done digitally. I used Hero Arts' digital paper that came with the kit, stamped the Word Art Dictionary on top of it, and stamped a Bird in a Cage image on the bottom right corner. I resized the image to fit an A2 card.

Then I stamped the same Bird in a Cage image several times on white background. After printing, I cut out the background paper which is slightly smaller than an A2 card and distressed the edges with dye ink. Then, I cut out a plain white print out of the Bird in a Cage image, distressed it with Peeled Paint ink and layered it on top of the patterned paper background.
Birthday Birdcage

Then I cut a small slit on top of the birdcage and tied a ribbon to make it look like that the cage is hanging. I then added a handwritten sentiment and attached it using the Tiny Attacher. A small pearl adds a touch of elegance on this card.
Birthday Birdcage 2

This week, I'll do a bit of coloring on all the butterfly prints. Hopefully, I'll be able to make more cards this weekend.

Thanks for looking!

Sweet As Sugar

I instantly fell in love with Basic Grey's Sugar Rush Line. I love the range of colors that are not too bright but still evoke a very happy and warm feeling. I think I am getting better at using BG products. I was able to complete the following projects in one sitting. Yay!

I have this photo of Ariel which I took using my lensbaby. I loved it and wanted to scrap it so badly. And then I have this paper, Cinnamon Bear, which I fell in love with and wanted to use the moment I saw it. Both are a bit busy so I had to find a way to make it work. I decided to mat the photo with Jelly Beans paper (I used the back) to make it stand out against the busy background. I distressed the edges of the paper with chalk ink to define it against the busy backdrop. And because the base paper has such gorgeous colors that I want to show, I opted for a simple layout with a lot of white space.

To avoid cluttering the page, I opted for hidden journaling which I inserted behind the photo.

I used the matching Sticker Elements to embellish the page. I used the tree branch horizontally as a perch for the bird instead of vertically, which I thought was very clever. LOL! I used foam adhesive on the bird and some parts of the branch for dimension. The title was from the Mini Monograms of the same line.

I added a few more elements on the upper left portion of the page to balance the grouping of elements on the lower right portion. Here, I used foam adhesive on one heart to add dimension. The red pearls add touch of elegance and texture.

For this next layout, I used Candy Hearts as base. I thought it brings out the greens in the photo. I brought out my cardstock (Bazzil) stash and found one that I can use for this layout. I then cut out a strip from the Jelly Beans paper, and some patterns from Peanut Brittle paper. I arranged the cut out patterns on the cardstock, right side down, and sprayed the cardstock with Shimmerz - Bamboo Leaf.

I also decided on a hidden journaling since the page is already very busy. I added a bit of Diamond Glaze on the heart at the center of the flower for a bit of dimension. It's not that visible in the photo but it's there.

I also added Diamond Glaze on the circle with heart to make it look like an epoxy sticker (again, not that visible in this photo). The bird was adhered using foam tape. I thought the die cut sticker that says "today is: absolutely perfect" just captures how I felt at the time the photo was taken.

I also cut out a pattern from Bottle Caps paper. After starting on one pattern, I realized it's too hard! It's that plant at the lower left side of the photo. But since I've already started cutting, I decided to just finish one. So there it is! The butterfly was cut using Slice.

The sparkly stuff are mica flakes. My favorite element here is THE TURTLE! Isn't it the cutest?
I used white Thickers for the title which I painted a bit with Antique Lace Shimmerz which I absolutely love (photo is horrible though), and topped with a bit of mica flakes.

After the layouts, I decided to use the leftover scraps for cards. I made two 5x7 cards from the scraps. The paper here is Bottle Caps - I used both sides! I cut one piece which is slightly smaller than the base card, and another one that is even smaller. I just layered the papers on the card and embellished with Rub Ons and a stamped butterfly which I colored with a marker. I used red pearls to embellish the card.

I used foam adhesive on the butterfly wings to add dimension.

This one has the same basic design, using both sides of Peanut Brittle paper. I stamped the sentiment on a strip of paper and perched the owl on it. I used googly eyes (is that what they are called?) on the stamped image to make it more fun. I gave this card to a colleague who recently lost her sister in a tragic fire and my note was a bit serious so the cute and fun owl sort of lightens the mood of the card.

I also adhered the owl using foam adhesive to make it three-dimensional.

I really enjoyed making the layouts and cards! I was so inspired by the papers and I found it easy to use them on my projects.

Basic Grey Sugar Rush line and Shimmerz are now available at My Little Attic. I was told only a few items are left so better hurry and get some before they are gone.

Thanks for looking!

Farewell gift

A friend of mine will be moving to New York next week and I thought I'll send her off with a notebook so she can scribble her thoughts about this next chapter of her life. I made this for her.
Traveler's Notebook


The stamp belongs to my colleague and she lent it to me for a few weeks. I stamped the image twice on white cardstock. I colored one with Copic Markers. I only colored some elements in the second image - the flower on the hair, the stickers on the luggage. Then I cut out the parts I colored on the 2nd image and layered them on top of the first stamped image. I added Stickles on the red flower on the hair, and the slippers.
Traveler's Notebook 3


Then I embellished with paper flowers and bling. I added some gold Mica Flakes on the petals of the paper flowers.
Traveler's Notebook 2


I also made a card just to thank her for her friendship. I stamped the butterfly image three times on white cardstok, colored them with Copic Markers and then cut them out. I adhered them on a piece of pattered paper and then adhered it on the base card.
Butterfly Trio

I used foam adhesives on the wings to add dimension to the card.
Butterfly Trio 2


I hope my friend likes these.

Thanks for looking!

More Basic Grey Marrakech Projects

Did you know that My Little Attic is one of the first, if not THE first, local store to bring Basic Grey to the Philippine shores? I fell in love with BG when I first started scrapping and soon I began hoarding the papers. Lily Kate was among my all time favorite lines. I still have a few papers left from my hoard (I used to buy 2 of each sheet!). I also still have Motifica and Skate Shop papers from my first few purchases. Now, I'm happy to be using some of Basic Grey's newer lines. One of these is the Marrakech line. I've already shared some projects at the MLA blog and also a few posts back in this blog (see it here and here). Here are a few more projects I created using the papers and chipboards of Marrakech.

First off is a 12 x 12 layout called East Mebon. I used a photo taken during our trip to Cambodia. When I saw the Darjeelings paper, I knew right away which photo I would use.


I stamped the journaling block and added hand-written journaling.

That photo corner is actually a chipboard covered with cardstock and stamped on.

Here are the materials used for this layout:
Patterned Papers – Basic Grey Marakech (Darjeelings, Honeybush, Elderflower), Cardstock – Bazzil, Chipboards – Basic Grey Marakech and Bazzil Chips

And here's how I made it:
  • Ink edges of cardstock using chalk ink.
  • Cut an 11” strip from Honeybush paper. Ink edges.
  • Cut an 11 ¾” strip from Elderflower paper. Ink edges.
  • Cut pattern from Darjeelings paper. Ink edges.
  • Assemble and adhere the strips of paper on the cardstock.
  • Stamp journaling block on green cardstock.
  • Cover corner chipboard with green cardstock. Cut to shape. Stamp flourish on the covered chipboard.
  • Adhere journaling block, photo and chipboards.
  • Adhere title.
  • Write journaling.
The next layout is called Ocean Adventure. The photo was taken while dolphin watching in Dumaguete. While the papers are not those typically used for summer or beach layouts, I decided to give it a try since the colors match my and Ariel's shirts.


I added sparkle, dimension and texture using Stickles.

I also used stickles on the flower centers. And as always, I did a bot of stamping on my page.

Here are the materials I used for this layout:
Patterned Papers – Basic Grey Marakech (Elderflower, Masala Bella, Honeybush), Cardstock – Bazzil (red), Chipboards – Basic Grey Marakech, Stickles

And here's how I made it:
  • Distress edges of red cardstock with dye ink.
  • Cut Honeybush paper into 7.5 x 12 and distress with dye ink.
  • Cut flower patterns from Masala Bella paper. Distress edges with dye ink.
  • Adhere photo at an angle on the top portion of the red cardstock.
  • Adhere patterns cut from the Masala Bella paper as well as chipboards on both sides of the photo.
  • Adhere the Honeybush paper on the bottom portion of the layout, overlapping on a portion of the photo.
  • Cut a strip of Elderflower cardstock and distress edges with ink. Adhere on top of the Honeybush paper leaving a small margin above.
  • Cut the title from the Masala Bella paper using Slice. Distress with ink to darken and increase contrast. Adhere on the layout.
  • Stamp a journaling block on the patterned paper using dye ink. Write the journaling.
  • Apply dots using Stickles on flower centers and across the Elderflower strip.
Finally, I made a card using scraps of paper leftover from the layouts.


My favorite element in the card is the butterfly that was stamped and embossed on vellum.

Here are the materials used for this card:
Materials: Card, Patterned Papers – Basic Grey Marakech (Vanilla Chai, Calming Moon), Ribbon – Basic Grey, RubOns – Autumn Leaves

And here's how I made the card:
  • Cut a 2 x 7 strip from Vanilla Chai paper. Distress with dye ink and adhere to bottom of card.
  • Punch a design along the border of the Calming Moon paper. Cut into 2 strips of 1 x 7 and .5 x 7. Distress the strips with dye ink. Adhere the wider strip on top of the Vanilla Chai paper and the narrower strip on the topmost portion of the card.
  • Stamp a butterfly image using pigment ink on the card.
  • Stamp flourish patterns on the card using Glue Pad and dust with Perfect Pearls.
  • Stamp another butterfly using embossing ink on a piece of vellum. Pour copper embossing powder on the stamped image and heat until the powder has been embossed. Cut along the pattern and fold wings. Adhere the body using dimensional adhesive directly on top of the other butterfly image.
  • Apply greeting RubOns on the card.
  • Adhere ribbon on the card.
There you have it. Basic Grey products are available at My Little Attic.

Thanks for looking!